
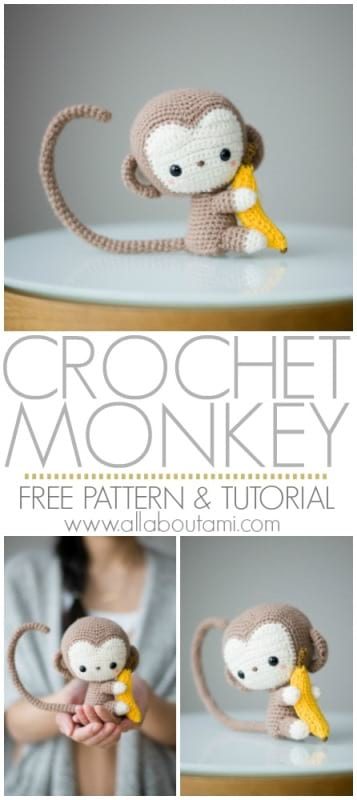
From site: https://www.allaboutami.com/monkeypattern/
Materials:
- lightweight tan yarn, level 3 (I used “Patons Astra” in “Medium tan”)
- lightweight beige yarn, level 3 (I used “Patons Astra” in “Aran”)
- sport weight yellow yarn, level 2 (I used Lion Brand Bonbons in the colour combo “Beach”)
- 2 mm Clover Amour crochet hook
- Yarn needle (bent tip helpful for attaching amigurumi parts- see HERE)
- Fiberfill
- 9 mm safety eyes
- Brown embroidery floss (for nose/mouth and banana)
- Beige felt (for lining of ear)
- Clover lock ring stitch markers
- Optional: Decorative Floral wire (12 gauge), pink sharpie/paint/blush for cheeks
Note: I worked in continuous rounds (vs. joined rounds). The wiring in this amigurumi is optional and should be used with caution as it is not safe for babies and young children. The wiring makes the tail and limbs poseable but is not necessary.
***PLEASE follow along with my step-by-step blog post HERE to better understand this written pattern and to visually see how to connect the parts with all my photos!
Finished Dimensions: 5.5″/14 cm tall and 4.5″/11.4 cm wide not including tail
FACE
Using beige yarn and 2 mm hook,
Chain 11 (we will be working in rows for this part).
R1: Starting from second chain from hook, Sc 10 (10 sts)
R2: Chain 1, turn. Inc, Inc, Sc 6, Inc, Inc (14 sts)
R3: Chain 1, turn. Inc, Sc 12, Inc (16 sts)
R4-5: Chain 1, turn. Sc 16
R6: Chain 1, turn. Inc, Sc 14, Inc (18 sts)
R7-11: Chain 1, turn. Sc 18 (18 sts)
We will now be dividing the face into half to form the heart-shaped forehead. Place Clover lock ring stitch markers in the middle two stitches (9 sts in each half).
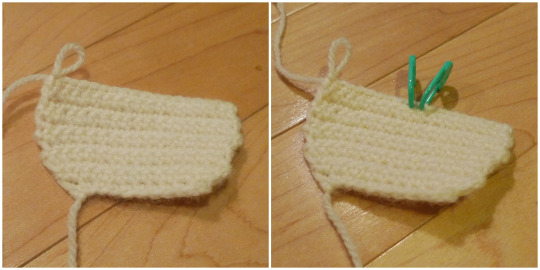
R12: Chain 1, turn. Sc, Hdc, Hdc, Dc, Dc, Dc, Hdc, Hdc, Sc (9 sts)
R13: Chain 1, turn. Dec, Hdc, Dc, Dc, Dc, Hdc, Dec (7 sts)
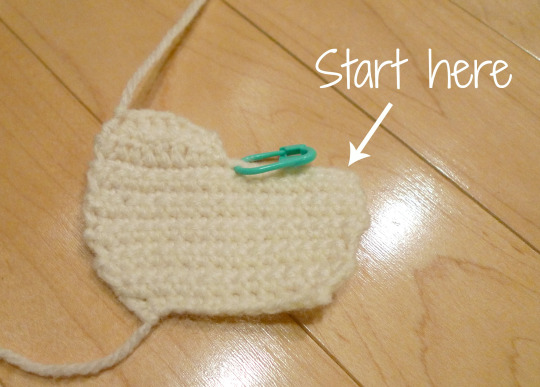
Fasten off. Rejoin yarn on far right side as shown below. Repeat Rows 12-13:
R12: Sc, Hdc, Hdc, Dc, Dc, Dc, Hdc, Hdc, Sc (9 sts)
R13: Chain 1, turn
Dec, Hdc, Dc, Dc, Dc, Hdc, Dec (7 sts)
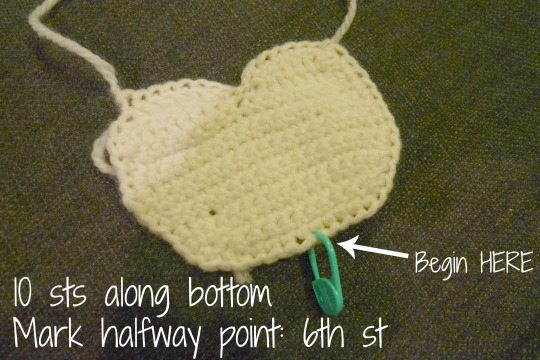
We will now crochet around the perimeter of the face as shown below.
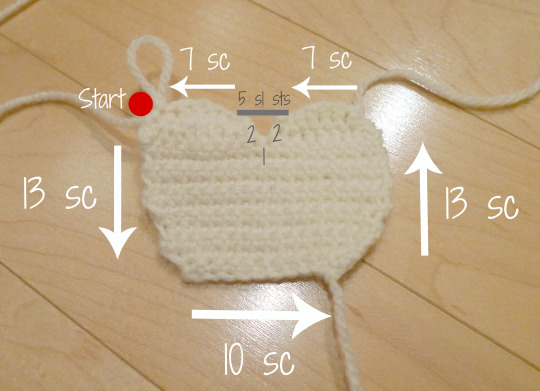
R14: Crochet counter-clockwise starting from red dot as shown in diagram above: 13 sc down the side, 10 sc across, 13 sc up the side, 7 sc around the curve, 5 slip stitches in the area between the dip of the curves (2 sl st, 1 sl st, 2 sl st), and then 7 sc around the other curve. (55 sts)
Fasten off.
HEAD
Switch to tan yarn as indicated by diagram below. There are 10 sts along the bottom- mark off one of the halfway points with a stitch marker (the 6th stitch) and begin your brown yarn here:
R1: Sc 5, Inc, Sc 10, *Inc, Sc 1*, rep 5 times. Sc 3, *Sc 1, Inc*, rep 5 times. Sc 10, Inc, Sc 5 (67 sts)
R2: Sc 17, *Inc, Sc 2*, rep 4 times. Dec x 2, Sc 1, Dec x 2. *Sc 2, Inc*, rep 4 times. Sc 17 (71 sts)
R3: Sc 33, Dec, Sc 1, Dec, Sc 33 (69 sts)
R4: Sc 32, Dec, Sc 1, Dec, Sc 32 (67 sts)
R5-9: Sc 67
R10: *Sc 5, Dec*, rep 9 times. Sc 4 (58 sts).
R11-13: Sc 58
R14: *Sc 7, Dec*, rep 6 times. Sc 4 (52 sts)
R15: *Sc 11, Dec*, rep 4 times (48 sts)
R16: *Sc 6, Dec*, rep 6 times (42 sts)
R17: *Sc 5, Dec*, rep 6 times (36 sts)
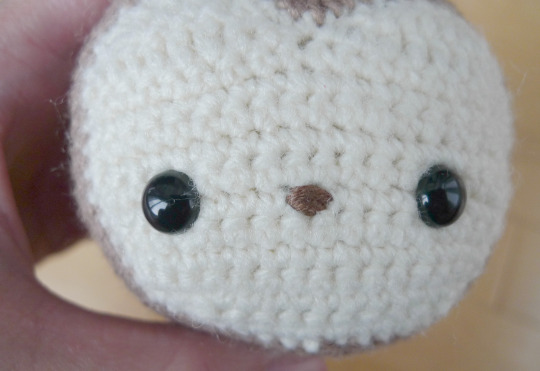
Embroider nose with brown embroidery floss and place safety eyes between Rows 7-8 and 8 stitches apart. Begin stuffing head.
R18: *Sc 4, Dec*, rep 6 times (30 sts)
R19: *Sc 3, Dec*, rep 6 times (24 sts)
R20: *Sc 2, Dec*, rep 6 times (18 sts)
R21: *Sc, Dec*, rep 6 times (12 sts)
Finish stuffing head.
R22: *Dec*, rep 6 times (6 sts)
Draw through front loops of last stitches and pull tightly shut. Add pink cheeks to Monkey’s face with pink sharpie, pink brads, or pink blush.
EARS (make 2)
Using tan yarn,
R1: 8 sc in Magic Ring (8 sts)
R2: 2 sc in each sc around (16 sts)
R3: *Sc 1, Inc*, rep 8 times (24 sts)
R4-6: Sc 24
Pinch shut and sew open ends together. Sew onto sides of head across Rounds 8-10 of tan yarn. For lining of ear, cut two semi-circles out of beige felt and glue to inner ear.
BODY
Using tan yarn, begin forming triangular base:
Chain 2 (we will be working in rows for this part).
R1: Starting from second chain from hook, Sc 1 (1 st)
R2: Chain 1, turn. Inc (2 sts)
R3: Chain 1, turn. Inc x 2 (4 sts)
R4: Chain 1, turn. Inc, Sc 2, Inc (6 sts)
R5: Chain 1, turn. Sc 6 (6 sts)
R6: Chain 1, turn. Inc, Sc 4, Inc (8 sts)
R7: Chain 1, turn. Sc 8 (8 sts)
R8: Chain 1, turn. Inc, Sc 6, Inc (10 sts)
R9: Chain 1, turn. Sc 10 (10 sts)
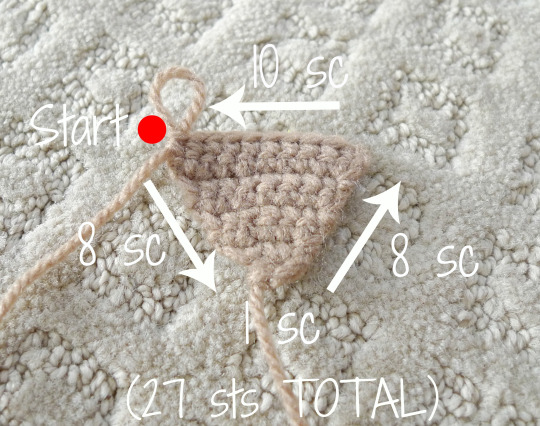
R10: Crochet counter-clockwise around triangle starting from the red dot as indicated in diagram above (we will now be working in rounds):
8 sc down the side, 1 sc at the bottom, 8 sc up the other side, 10 sc across the top.
R11: In back loops only, Sc 27 (27 sts)
R12-13: Sc 27 (27 sts)
R14: *Sc 7, Dec*, rep 3 times (24 sts)
R15: Sc 24 (24 sts)
R16: *Sc 6, Dec*, rep 3 times (21 sts)
R17: Sc 21 (21 sts)
R18: *Sc 5, Dec*, rep 3 times (18 sts)
R19-20: Sc 18 (18 sts)
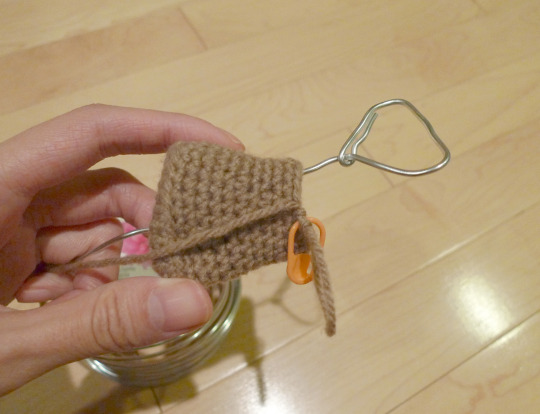
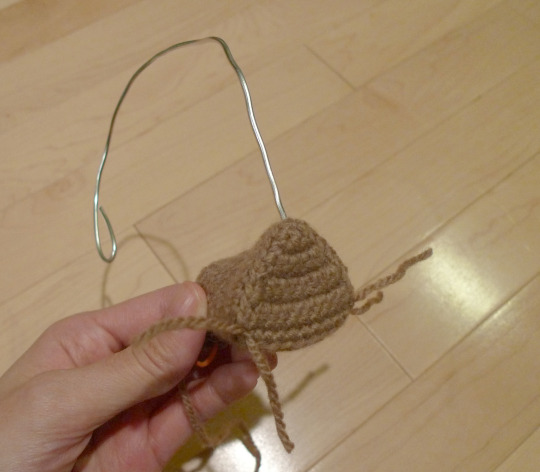
Fasten off and leave long end for sewing. If using wiring, cut at least 15″/38 cm of decorative wiring. Form one end into triangular base that can fit into bottom of body. Place triangular base into bottom of body while poking other end of wire out of corner of triangle to form tail. Secure triangular base by tying each corner with yarn. Bend end of tail and wrap electrical tape around it to prevent end from protruding out. Our final tail measured approximately 23 cm/9″ (with end bent).
Form wire arms and legs as shown below, once again wrapping ends with electrical tape. Our limbs measured approximately 3 cm/1.18″ long after being bent.. You can also crochet the limbs first to gauge what size you need to make the wire inserts.
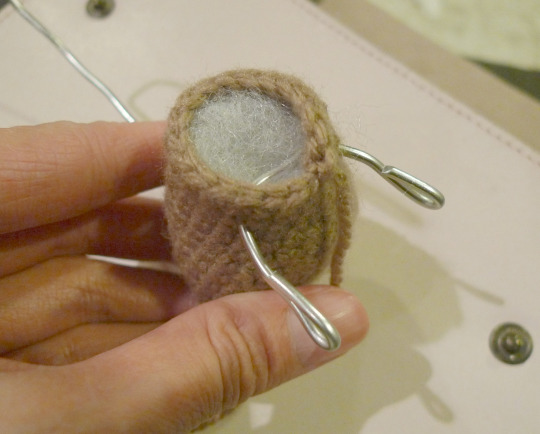
Now stuff and sew body to head. Attach head so that it is tilting downwards, near where the beige face becomes the brown head.
ARMS (make 2)
Using beige yarn (no need to stuff if using wiring),
R1: 6 sc in Magic Ring (6 sts)
R2: *Sc 2, Inc*, rep 2 times (8 sts)
R3-4: Sc 8 (8 sts)
Switch to tan yarn,
R5-8: Sc 8 (8 sts)
Fasten off and leave long end for sewing. Insert onto wire arms and sew onto body.
LEGS (make 2)
Using beige yarn (no need to stuff if using wiring),
R1: 6 sc in Magic Ring (6 sts)
R2: *Sc 2, Inc*, rep 2 times (8 sts)
R3: *Sc 3, Inc*, rep 2 times (10 sts)
R4: Sc 10 (10 sts)
Switch to tan yarn,
R5-8: Sc 10 (10 sts)
Fasten off and leave long end for sewing. Insert onto wire legs and sew onto body.
TAIL
Using tan yarn (no need to stuff if using wiring),
R1: 6 sc in Magic Ring (5 sts)
R2-44: Sc 6 (6 sts).
Adjust tail to your desired length (shorter or longer based on your wire tail). Insert onto wire tail and attach to back of body.
NOTES if not using wiring:
- Stuff arms and legs very lightly.
- Minimally stuff the tail (perhaps just at base where tail joins with body) to prevent the tail from weighing down the monkey too much. Shorten the tail length (possibly to half) to minimize weight.
- Do not stuff the body too much- make sure that the triangular base can be inverted so that your monkey can sit well. If you stuff it too much, the triangular base will puff out, making it impossible for your monkey to sit and likely to topple over.
BANANA
Using yellow yarn,
Chain 21 (we will be working in rows).
R1: Starting from second chain from hook, Sl st 2, Hdc 16, Sl st 2 (20 sts).
R2: Chain 1, turn. In front loops only, Sl st 2. In third loops only, Hdc 16. In front loops only, Sl 2 (20 sts). [See tutorial HERE to learn how to locate third loops of half double crochets!]
R3: Chain 1, turn. Sl st 2, Hdc 16, Sl st 2 (20 sts).
R4: Repeat Row 2.
R5: Repeat Row 3.
R6: Repeat Row 2.
R7: Repeat Row 3.
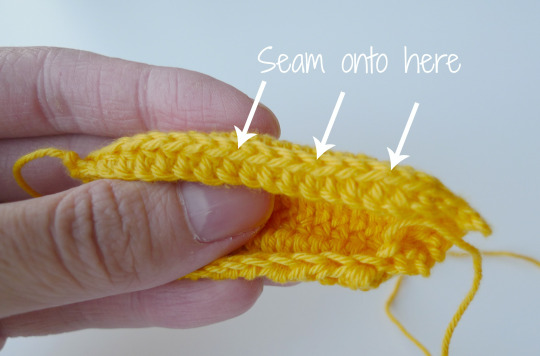
R8: Sl st 2, *Hdc 2, Hdc dec*, rep 4 times, sl st 2. (16 sts)
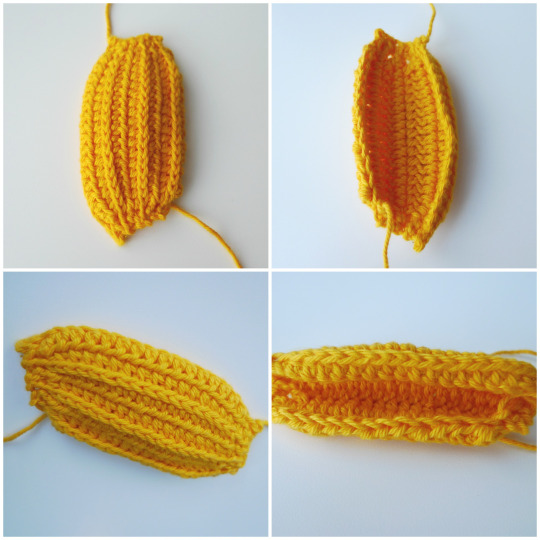
Sew banana shut by sewing onto second last row as shown below.
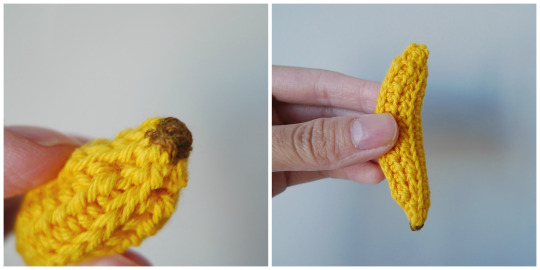
Using brown embroidery floss, sew a star/asterisk onto bottom of banana. Then, sew around perimeter of star.
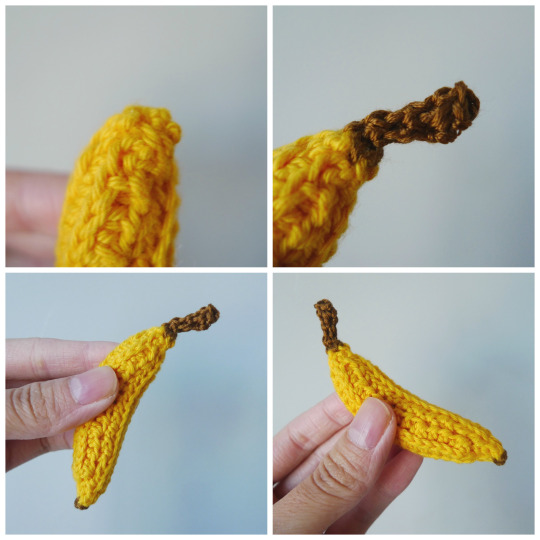
To create stem:
Round 1: Pick up 4 stitches- Sc 4 (4 sts).
R2-4: Sc 4 (4 sts)
R5: Sc 1, Inc, Sc 2 (5 sts).
Fasten off and weave in ends.
Your adorable monkey is now complete! Have fun posing your cutie pies and making them for all the little monkeys in your life!
EM PORTUGUÊS
Amigurumi Pattern
Monkey Pt Br
Original design by Stephanie Lau of www.AllAboutAmi.com
(translated into portuguese)
Translated by Valéria Barbosa of
http://amigurumibrasil.com.br/
Materiais Necessários
Linhas bege, amarelo e marrom
Agulha de Tapeçaria
Olhos de Segurança 9mm
Feltro Bege
Enchimento
Opcional: Blush ou Marcador rosa
Rosto
Cor: Bege
11corr
1. A partir da segunda corr, 10pb
2. Corr, vire. Aum, aum, 6pb, aum, aum (14)
3. Corr, vire. Aum, 12pb, aum (16)
45. Corr, vire. 16pb (16)
6. Corr, vire. Aum, 14pb, aum (18)
711. Corr, vire. 18pb (18)
Agora dividiremos o rosto em duas partes, coloque marcadores no meio da
carreira, com 9 pontos para cada lado.
12. Corr, vire. Pb, mpa, mpa, pa, pa, pa, mpa, mpa, pb (9)
13. Corr, vire. Dim, mpa, pa, pa, pa, mpa, dim (7)
Arremate
Repita os passos 12 e 13 do outro lado do rosto.
Faça uma carreira de pb em volta do trabalho
14. Seguindo a foto, faça 13pb do lado, 10pb na linha de baixo, 13pb do
lado, 7pb na curva, 5pbx na area entre as curvas (2pbx, pbx, 2pbx), e então
7pb na outra curva (55)
Arremate
Cabeça
Cor: Marrom
Coloque um marcador na metade do trabalho ( o 6o ponto) e comece aqui.
1.5pb, aum, 10pb, [aum, pb] x5. 3pb, [pb, aum] x5. 10pb, aum, 5pb (67)
2. 17pb, [2pb, aum] x4, dim, dim, pb, dim, dim, [2pb, aum] x4, 17pb (71)
3. 33pb, dim, pb, dim, 33pb (69)
4. 32pb, dim, pb, dim, 32pb (67)
59. Pb em toda a volta (67)
10. [5pb, dim] x9, 4pb (58)
1113. Pb em toda a volta (58)
14. [7pb, dim] x6, 4pb (52)
15. [11pb, dim] em toda a volta (48)
16. [6pb, dim] em toda a volta (42)
17. [5pb, dim] em toda a volta (36)
Bordar o nariz e colocar os olhos de segurança entre as carreiras 7 e 8, com
8pts de separação.
18. [4pb, dim] em toda a volta (30)
19. [3pb, dim] em toda a volta (24)
20. [2pb, dim] em toda a volta (18)
21. [1pb, dim] em toda a volta (12)
22. Dim em toda a volta (6)
Arremate
Pinte bochechas rosas, com blush ou marcador.
Orelhas (Faça 2)
Cor: Marrom
1.Anel Mágico: 8pb (8)
2. aum em toda a volta (16)
3. [1pb, aum] em toda a volta (24)
46. pb em toda a volta (24)
Arremate
Feche as orelhas e costure as aberturas. Costure nos lados da cabeça entre
as carreiras 810 da linha marrom.
Para a parte interna da orelha, corte dois semicirculos de feltro bege e cole.
Corpo
Cor: Marrom
2corr
1. A partir da segunda corr, faça 1pb
2. Corr, vire. aum (2)
3. Corr, vire. 2aum (4)
4. Corr, vire. aum, 2pb, aum (6)
5. Corr, vire. 6pb (6)
6. Corr, vire. aum, 4pb, aum (8)
7. Corr, vire. 8pb (8)
8.Corr, vire. aum, 6pb, aum (10)
9. Corr, vire. 10pb (10)
10.Seguindo a foto, faça, 8pb no lado, 1pb na parte de baixo, 8pb do outro
lado, 10pb na parte de cima
11. 27pb apenas nas alças traseiras (27)
1213. pb em toda a volta (27)
14. [7pb, dim] x3 (24)
15. pb em toda a volta (24)
16. [6pb, dim] x3 (21)
17. pb em toda a volta (21)
18. [5pb, dim] x3 (18)
1920. pb em toda a volta (18)
Arremate
Finalize e deixe fio para costurar. Se optar por usar arame, corte pelo
menos 38cm. Forme uma parte da base triangular que pode encaixar no fim
do corpo. Coloque a base triangular de crochê na base do corpo, enquanto
usando o outro fim do arame para formar o rabo. Enrole o fim do rabo com
fita, para evitar que saia pelo trabalho.
O rabo final mede aprox 23cm. (Com o fim dobrado).
Forme braços e pernas de arame como na foto, novamente aplicando fita no
fim dos arames. Os membros medem aprox 3cm, depois de dobrados.
Você também pode fazer os membros primeiro para ver a quantidade de
arame que vai precisar.
Agora encha e costure a cabeça no corpo. Costure de forma que fique
levemente para baixo, perto de onde a parte bege e marrom se encontram.
Braços
Cor: Bege, Marrom
Comece com Bege
1. Anel Mágico: 6pb (6)
2. [2pb, aum] em toda a volta (8)
34. pb em toda a volta (8)
Mude para Marrom
58. pb em toda a volta (8)
Finalize e aplique os arames (opcional) e costure ao corpo.
Pernas
Cor: Bege, Marrom
Comece com Bege
1. Anel Mágico: 6pb (6)
2. [2pb, aum] em toda a volta (8)
3. [3pb, aum] em toda a volta (10)
4. pb em toda a volta (10)
Mude para Marrom
58. pb em toda a volta (10)
Finalize e aplique os arames (opcional) e costure ao corpo.
Rabo
Cor: Marrom
1. Anel Mágico: 6pb (6)
244. pb em toda a volta (6)
Ajuste o rabo ao comprimento desejado (mais curto ou longo, baseado no
arame). Insira o arame e costure no corpo.
NOTAS
Se não for usar arame
Encha os braços e pernas levemente.
Encha o rabo minimamente (talvez só a base, onde se junta ao corpo) para
evitar que pese muito. Diminua o tamanho do rabo pela metade, também
para evitar que pese.
Não encha muito o corpo Tenha certeza de que a base triangular possa ser
invertida, para o macaco pode sentar. Se encher muito, a base não ficará
reta, e ele não ficará sentado.
Banana
Cor: Amarelo
21corr
1. A partir da segunda corr, 2pbx, 16mpa, 2pbx (20)
2. Corr, vire. Apenas nas alças dianteiras, 2pbx. Apenas nas alças terciárias,
16mpa
Apenas nas alças dianteiras, 2pbx.
(Se não sabe aonde ficam as alças terciárias, veja como localizálas AQUI)
3. Corr, vire. 2pbx, 16mpa, 2pbx (20)
4. Repita o passo 2
5. Repita o passo 3
6. Repita o passo 2
7. Repita o passo 3
8. 2pbx, [2mpa, dim mpa] x4, 2pbx (16)
9. 2pbx, [2mpa, dim mpa] x4, 2pbx (16)
Costure a banana na última carreira, como na foto.
Borde um asterisco/estrela no fim da banana, depois borde em volta.
Para Criar o Talo
1. Puxe 4pts da carreira anterior, e faça 4pb (4)
24.pb em toda a volta (4)
5. pb, aum, 2pb (5)
Arremate
Seu macaco adorável está pronto! Se divirta posando esta fofura e o fazendo
para todos os macaquinhos em sua vida!
Esta receita é original de Stephanie Lau de All About Ami (Fevereiro
2016).
Por favor não clame esse padrão como seu. Se quiser compartilhar esta
receita, pode colocar um link da página, mas por favor não a recrie em
seu site. Pode manter uma cópia para uso pessoal, mas NÃO pode vender
ou distribuir esta receita.
Você pode vender produtos feitos a partir desta receita, mas por favor
credite a criadora, Stephanie Lau de All About Ami, e disponibilize um link
para a página www.AllAboutAmi.com. Não é permitida a produção em
massa de qualquer tipo. Obrigada pelo respeito e compreensão.
This pattern is an original pattern by Stephanie Lau of All About Ami
(February 2016). Please do not claim this pattern as your own. If you wish
to share this pattern, you may link to this pattern but please do not reprint
it on your site. You may keep a copy for your own personal use but please
DO NOT sell the pattern or distribute it.
You may sell products made from this pattern but please clearly credit the
design to me, Stephanie Lau of All About Ami, and provide a link to my
blog www.AllAboutAmi.com. Permission is NOT granted for mass
production or factory manufacturing of any kind. Thank you for being
respectful and for your understanding!
Nenhum comentário:
Postar um comentário